写法的变更 之前
1
2
const divNode = <div > 你好,React</div > ReactDOM .render (divNode,document .getElementById ('root' ))
会警告
现在
1
2
3
4
5
<script type="text/babel" > const divNode = <div > 你好,React</div > const root = ReactDOM .createRoot (document .getElementById ('root' )) root.render (divNode) </script>
同时,不支持渲染对象
1
2
3
4
5
6
7
8
const array = ['动感超人' ,'西瓜超人' ]; const listObj = [ {name :'李白' ,sex :'男' }, {name :'李白2' ,sex :'男' }, ] const divNode = <div > 你好,React {listObj}//不支持</div > const root = ReactDOM .createRoot (document .getElementById ('root' )) root.render (divNode)
引入
1 import ReactDOM from "react-dom/client"
Card封装为UI 1 2 3 4 5 6 7 8 9 10 11 12 13 14 15 16 const Logs = ( return ( <Card className ="logs" > <LogItem /> </Card > ) }; const Card = (props ) => { return ( <div className ={ `card ${props.className }`}> {props.children} </div > ); };
表单的双向绑定 通过setState和onChange来实现, 非受控 没有使用state,受控,使用了state并绑定了值1 2 3 4 5 6 7 8 9 10 11 12 13 14 15 16 17 18 19 20 21 22 23 24 25 <Card className="login-form" > <div className ='login-form_item' > <label > <span className ='label' > 日期:</span > <input type ='date' value ={inputDate} onChange ={(e) => setInputDate(e.target.value)}/> </label > </div > <div className ='login-form_item' > <label > <span className ='label' > 内容:</span > <input type ='text' placeholder ='请输入学习内容' value ={inputContent} onChange ={e => setInputContent(e.target.value)}/> </label > </div > <div className ='login-form_item' > <label > <span className ='label' > 时长:</span > <input type ='text' placeholder ='请输入学习时长' value ={inputTime} onChange ={e => setInputTime(e.target.value)}/> </label > </div > <div className ='login-form_operation' > <button className ='login-form_operation_btn' > 添加计划</button > </div > </Card >
数据为true的时候才会显示对话框 别漏掉了大括号哦
解决对话框层级问题 添加过滤功能 注意字符串的问题,因为这里用的是全等于号,所以在传出去的时候转化为了数字 1 2 3 4 5 6 7 8 9 10 11 12 13 14 const handleChange = (e ) => { console .log (e.target .value ) props.onChange (+e.target .value ); } return ( <div > <select value ={props.defaultValue} onChange ={handleChange} > <option value ={2022} > 2022</option > <option value ={2021} > 2021</option > <option value ={2020} > 2020</option > </select > </div > );
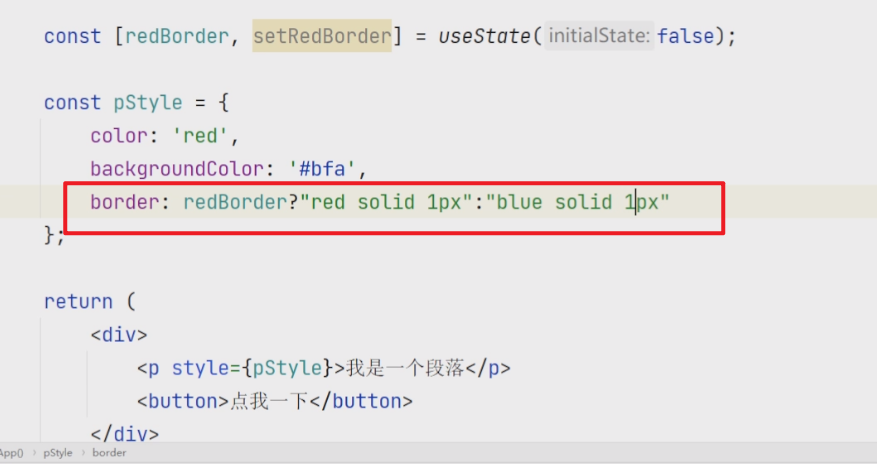
create-react-app 内联样式和行内样式
import "./App.css" 会全局污染吗?会的 ,引入是全局的,其他组件也可以看到import "./App.css" 就是全局引入,在App.js当中可以看到,其他组件也都可以使用App.css当中的类名模块化css(避免全局污染 ) 创建一个xxx.module.css 1 2 3 4 5 6 7 8 9 10 11 12 13 .p1{ color:red } .app_wrapper{ color:red } .app_wrapper_info { background-color: green; } .app_wrapper_name { background-color: blue; }
组件中引入 1 2 import classes from "./App.module.css" ;
通过classes来设置类 1 2 注意,最好不要出现除字母,数字,下划线以外的类名 比如出现app-wrapper_name就不要出现'-'了
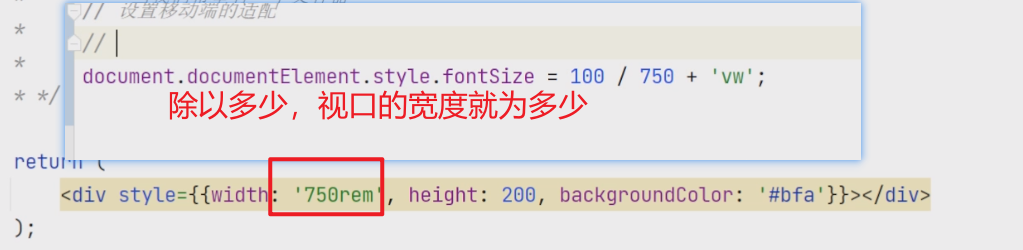
如果通过.module.css包含标签,比如直接设置div为棕色,依旧会影响到全局组件 视口的设置
Context 一种组件通信方式,常用于[祖组件] 和[后代组件]间的通信
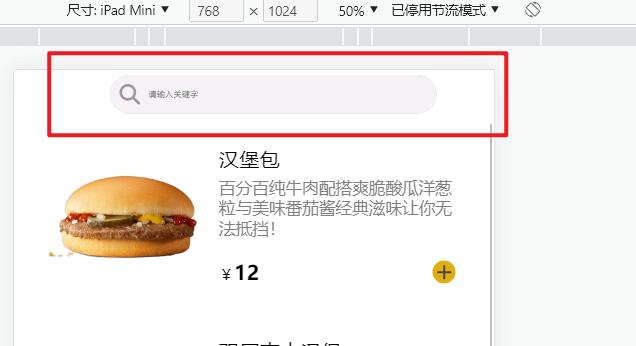
处理字体大小 在小手机是正常的,但是切换到大屏幕的手机就字体就有问题了
原因
像素比问题 所以不要将字体设置为px,设置为rem即可 但是假如你使用了转换插件,并且在input当中的placeholder的时候没有设置字体大小,就会出现这种情况,所以,最好的预防方法就是将出现字体的地方都设置下字体大小
public/img和src/asset public下的可以被服务器所访问,也就是有专门的地址可以看到这个 src/asset不可以被服务器访问,也就是没有入口可以看到这个 避免事件冒泡 1 <div className={classes.detail } onClick={e =>stopPropagation ()}>
遮罩层 1 2 3 <div {...props} className={`${classes.selfMask} ${props.className} ` } > {children} </div>
但是注意,{...props}要写在前面哦,如果写在后面,会覆盖已经书写的className属性 项目很多情况出现冒泡 很多情况出现冒泡,都需要在父元素身上绑定下stopPropagation 1 2 3 4 5 e.stopPropagation <div className={classes.confirm_operation } onClick={e =>stopPropagation ()}> <button className ={classes.confirm_operation_cancel} onClick ={cancel} > 取消</button > <button className ={classes.confirm_operation_clear} onClick ={confirm} > 清空</button > </div>
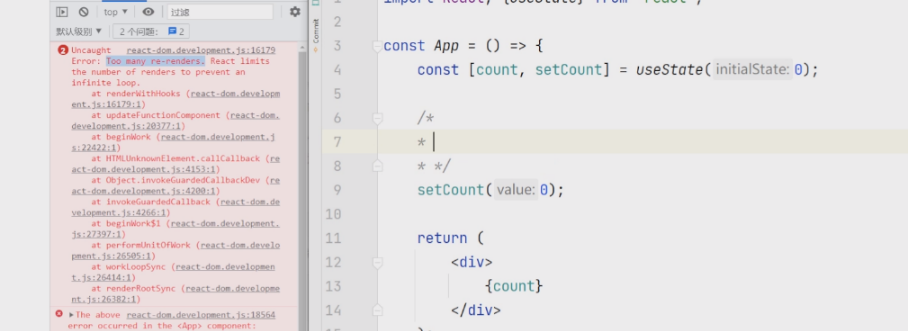
清空购物车后数量没有变化 useEffect和React严格模式和setState执行流程 React组件有部分逻辑都可以直接编写到组件的函数体中的,像是对数组调用filter、map等方法,像是判断某个组件是否显示等。但是有一部分逻辑如果直接写在函数体中,会影响到组件的渲染,这部分会产生“副作用”的代码,是一定不能直接写在函数体中。 例如,如果直接将修改state的逻辑编写到了组件之中,就会导致组件不断的循环渲染,直至调用次数过多内存溢出。 React.StrictMode 编写React组件时,我们要极力的避免组件中出现那些会产生“副作用”的代码。同时,如果你的React使用了严格模式,也就是在React中使用了React.StrictMode标签,那么React会非常“智能”的去检查你的组件中是否写有副作用的代码,当然这个智能是加了引号的,我们来看看React官网的文档是如何说明的: Strict mode can’t automatically detect side effects for you, but it can help you spot them by making them a little more deterministic. This is done by intentionally double-invoking the following functions:
Class component constructor, render, and shouldComponentUpdate methods Class component static getDerivedStateFromProps method Function component bodies State updater functions (the first argument to setState) Functions passed to useState, useMemo, or useReducer 上文的关键字叫做“double-invoking”即重复调用,这句话是什么意思呢?大概意思就是,React并不能自动替你发现副作用,但是它会想办法让它显现出来,从而让你发现它。那么它是怎么让你发现副作用的呢?React的严格模式,在处于开发模式 下,会主动的重复调用一些函数,以使副作用显现。所以在处于开发模式且开启了React严格模式时,这些函数会被调用两次:
类组件的的 constructor, render, 和 shouldComponentUpdate 方法getDerivedStateFromPropssetStateuseState, useMemo, or useReducer
重复的调用会使副作用更容易凸显出来,你可以尝试着在函数组件的函数体中调用一个console.log你会发现它会执行两次,如果你的浏览器中安装了React Developer Tools,第二次调用会显示为灰色。
函数组件setState(或者是setXXXXX)执行流程 1 2 3 4 5 6 7 8 9 10 setState() --> dispatchSetData() //1.会先判断,组件当前处于什么阶段 如果是渲染阶段 --> 不会检查state的值是否相同 如果不是渲染阶段 --> 会检查state的值是否相同 - 如果值不相同,则会对组件进行重写渲染 - 如果值相同,则不会组件进行重写渲染 如果值相同,React在一些情况下会继续执行当前组件的渲染 但是这个渲染不会触发其子组件的渲染,这次渲染不会产生实际的效果 这种情况通常发生在值第一次相同的时候
示例(非严格模式下) App.jsx
1 2 3 4 5 6 7 8 9 10 11 12 13 14 15 16 17 18 19 20 21 22 23 24 25 26 27 28 29 30 31 32 33 34 35 import React , {useState} from 'react' ;import B from "./B" ;const App = ( console .log ('App组件重新渲染了' ) const [count,setCount] = useState (0 ); const handleClick = ( setCount (1 ); } return ( <div > 我是App{count} <button onClick ={handleClick} > 点击我</button > <B /> </div > ); }; export default App ;
B.jsx
1 2 3 4 5 6 7 8 9 10 11 12 13 import React from 'react' ;const B = ( console .log ('B组件被重新渲染了' ) return ( <div > 我是B组件 </div > ); }; export default B;
还有这个示例也可以看看,setTimeout是异步的,执行的时候也是处于非渲染阶段,所以这个时候就不会导致重复调用从而产生Too many re-renders的报错 1 2 3 4 5 6 7 8 9 10 11 12 13 14 15 16 17 18 import React , {useState} from 'react' ;const App = ( console .log ('App组件重新渲染了' ) const [count,setCount] = useState (0 ); setTimeout (() => { setCount (1 ) },0 ) return ( <div > 我是App{count} </div > ); }; export default App ;
useEffect useEffect是一个钩子函数,需要一个函数作为参数,这个作为参数的函数,默认将会在组件渲染完毕后执行 (也就是在非渲染阶段才执行这个回调)
在实际开发中,可以将那些会产生副作用的代码编写到useEffect的回调函数中,这样子就可以避免这些代码影响到组件的渲染
说通俗点就是我不可以在渲染阶段去修改state的值,我需要在他渲染完毕后再去修改(就是变根回调的执行时机)
如果**不想每次都在渲染阶段useEffect被调用,**我们可以传入第二个参数
1 2 3 4 5 6 7 8 9 10 11 12 13 14 15 16 17 18 19 20 21 第二个参数为数组(即为依赖项目) 当数组当中的依赖项发送改变的时候,useEffect才会去调用 通过会将Effect 当中所有的变量都设置为依赖项目 这样子一来可以确保这些值发生变化时候,会触发Effect 变化 像setState ()是由钩子函数useState ()生成的 useState ()会确保组件的每次渲染都会获取到相同的setState ()对象,所以stateState可以不设置进Effect 所以下面的setShowDetail,setShowCheckOut,可以写进去,也可以不写进去 当第二个参数为空数组,则意味着Effect 只会在组件初始化的时候执行一次 const a = 10 ;useEffect (() => { console .log (a); setShowDetail (false ); setShowCheckOut (false ); },[a,setShowDetail,setShowCheckOut])
1 2 3 4 5 6 7 8 9 10 11 12 13 14 15 16 17 18 19 React 中的副作用操作* 发ajax请求获取数据 * 设置订阅 / 启动定时器 * 手动更改真实DOM import React from "react" ;React .useEffect (() => { return () => { } },[stateValue])
总结如果想每次渲染都执行,第二个参数什么都不写 如果想只当使用到的变量发生改变重新调用,那么第二个参数以数组的形式传入使用到的变量名(也就是写入依赖项目) 如果想只执行一次(初始化的时候执行),,第二个参数传入空数组[] 1 2 3 4 5 6 7 8 9 10 11 12 13 14 15 16 17 18 19 20 21 22 23 24 25 26 27 28 29 30 31 32 33 import React , {useEffect, useState} from 'react' ;import classes from "./index.module.css" ;import {FontAwesomeIcon } from "@fortawesome/react-fontawesome" ;import {faSearch} from "@fortawesome/free-solid-svg-icons" ;const Index = (props ) => { const [value,setValue] = useState ('' ) const handleChange = (e ) => { setValue (e.target .value .trim ()); } useEffect (() => { props.search (value); },[value]) return ( <div className ={classes.filter} > <div className ={classes.filter_search} > <FontAwesomeIcon className ={classes.filter_search_icon} icon ={faSearch} /> {/*<input type ="text" className ={classes.filter_search_input} placeholder ={ '请输入关键字 '} onChange ={handleChange}/ > */} <input type ="text" value ={value} onChange ={handleChange} className ={classes.filter_search_input} placeholder ={ '请输入关键字 '} /> </div > </div > ); }; export default Index ;
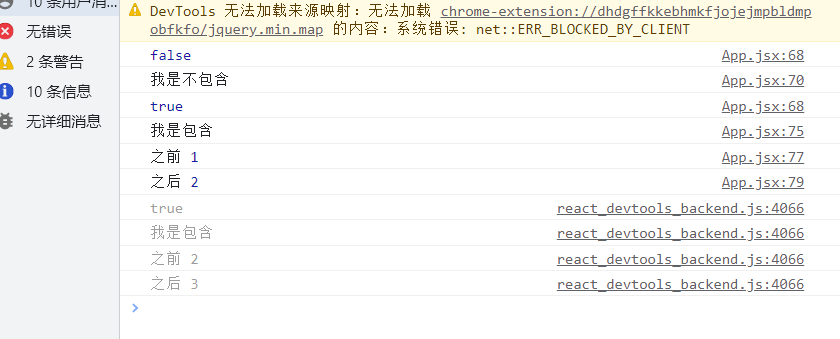
疑问 之前的时候,我设置购物车数量+1,总是会出现多加一次的情况 1 2 3 4 5 6 7 8 9 10 11 12 13 14 15 16 17 18 19 setCartData (prevState => const temp = {...prevState}; console .log (temp.list .includes (item)) if (!temp.list .includes (item)){ console .log ('我是不包含' ) item.amount = 1 ; temp.list .push (item); }else { console .log ('我是包含' ) console .log ('之前' ,item.amount ) item.amount +=1 ; console .log ('之后' ,item.amount ) } temp.total ++; return temp; })
我点击+号之后,再次点击+号,总是会重复调用
因为开启了严格模式,会去检查是否有副作用,就会调用二次(因为有时候调用二次副作用就凸显了出来)
useReducer 操作useState生成的数据,在多个函数对state设置了(state定义和方法的添加不在同一个地方),如下图就是这种情况 1 2 3 4 5 6 7 8 9 10 11 12 13 14 15 16 17 18 19 20 21 22 23 24 25 26 27 28 29 30 31 32 33 34 35 36 const [carData,setCatData] = useState ({})const addItme = (const removeItme = (const clearCart = (import React , {useState} from 'react' ;const App = ( const [number,setNumber] = useState (0 ); const handleReduce = ( setNumber (prevState =>1 ); } const handleAdd = ( setNumber (prevState =>1 ); } return ( <div > <button onClick ={handleReduce} > -</button > <span > {number}</span > <button onClick ={handleAdd} > +</button > </div > ); }; export default App ;
1 2 3 4 5 6 7 8 9 10 11 12 13 14 15 16 17 18 19 20 21 22 23 useReducer(reducer,initialArg,init) 参数: reducer:为一个函数(state,action) => stateValue reducer在执行的时候,会收到二个参数 * state 当前最新的state * action(一般叫action) 普通的js对象,可以将要干的事情告诉action, * 进而根据action中不同值来执行不同操作 * 为了避免type无效(区分操作的type),可以无论如何都会返回一个值 * 说白了reducer就是将对state的不同操作定义在同一个函数当中 initialArg: state的初始值,作用和useState()中的值是一样的 返回值:为数组 第一个参数: state 用来获取state的值 第二个参数:state修改的派发器 * 通过派发器可以发送操作state的命令 * 具体的修改行为将会由另外一个函数(reducer)执行
说通俗点就是dispatch是一个派活的,reducer是干活的,reducer根据指令不同,从事不同工作 1 2 3 4 5 6 7 8 9 10 11 12 13 14 15 16 17 18 19 20 21 22 23 24 25 26 27 28 29 30 31 32 33 34 35 36 37 38 39 40 41 42 43 44 45 46 47 48 49 50 51 52 53 54 55 const [count,countDispatch] = = useReducer ((state,action ) => { const { type } = action.type ; if (type === 'ADD' ) { return state + 1 ; }else if (type ==='SUB' ){ return state - 1 ; } return state; },1 ) const [count,countDispatch] = = useReducer ((state,action ) => { const { type } = action.type ; switch (type){ case 'ADD' : return state + 1 ; case 'SUB' : return state -1 ; default : return state; } },1 ) import React , {useState,useReducer} from 'react' ;const reducer = (prevState,action ) => { const {type} = action; switch (type){ case 'SUB' : return prevState - 1 ; case 'ADD' : return prevState + 1 ; default : return prevState; } } const App = ( const [number,numberDispatch] = useReducer (reducer,0 ) return ( <div > {/*点击按钮,调用指挥者(dispatch),指挥者再去通知reducer执行对应操作*/} <button onClick ={() => numberDispatch({type:'SUB'})}>-</button > <span > {number}</span > <button onClick ={() => numberDispatch({type:'ADD'})}>+</button > </div > ); }; export default App ;
reduce通常会定义在组件的外部,避免重复创建(注意,是Reducer创建在外面,不是useReducer创建在外面,否则useReudcer创建在外面会提示React Hook “useReducer” cannot be called at the top level. React Hooks must be called in a React function component or a custom React) 1 2 3 4 5 6 7 8 9 10 11 12 const App = ( const [count,countDispatch] = useReducer (() => { },0 ) } const reducer = (const App = ( const [count,countDispatch] = useReducer (reducer,0 ) }
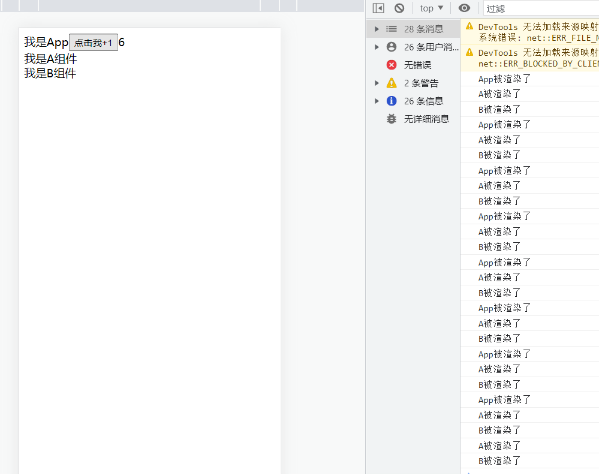
React.memo() 组件被重新渲染有二种情况第一种: 组件的state状态改变导致重新渲染 第二种: 父组件重新渲染导致子组件重新渲染 针对下面这种情况,我们就可以使用React.memo,可以看到,在没有使用React.memo的时候,App的值被改变,子组件也跟着改变了
有时候这种渲染很不好,比如我子组件什么都没有变化,就是因为父组件变化了,我就要变化,所以为了避免重复渲染导致性能上的问题,我们可以使用React.memo
React.memo()是一个高阶函数
经过React.memo()包装过的新组件具有缓存功能
包装过后,只有当组件的props发生变化后才会触发组件的重新渲染,否则总是返回缓存中结果 示例(非严格模式下)
1 2 3 4 5 6 7 8 9 10 11 12 13 14 15 16 17 18 19 20 21 22 23 24 25 26 27 28 29 30 31 32 33 34 35 36 37 38 39 40 41 42 43 44 45 46 47 48 49 50 51 52 App .jsx import React , {useState} from 'react' ;import A from "./component/A" ;const App = ( console .log ('App被渲染了' ) const [number,setNumer] = useState (0 ); const handleClick = ( setNumer (prevState =>1 ); } return ( <div > 我是App <button onClick ={handleClick} > 点击我+1</button > {number} <A /> </div > ); }; export default App ;A.jsx import React from 'react' ;import B from "./B" ;const A = ( console .log ('A被渲染了' ) return ( <div > 我是A组件 <B /> </div > ); }; export default React .memo (A);B.jsx import React from 'react' ;const B = ( console .log ('B被渲染了' ) return ( <div > 我是B组件 </div > ); }; export default React .memo (B);
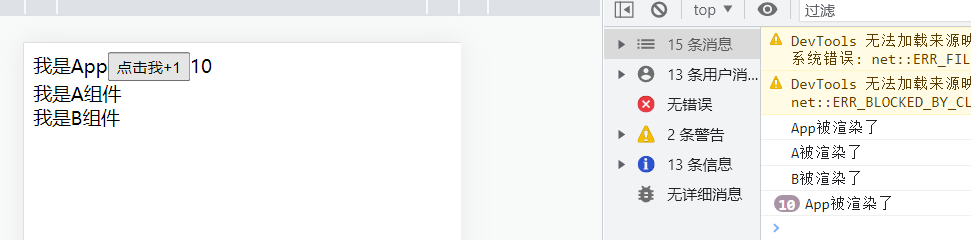
效果:点击+1多少次,子组件都不会被重新渲染
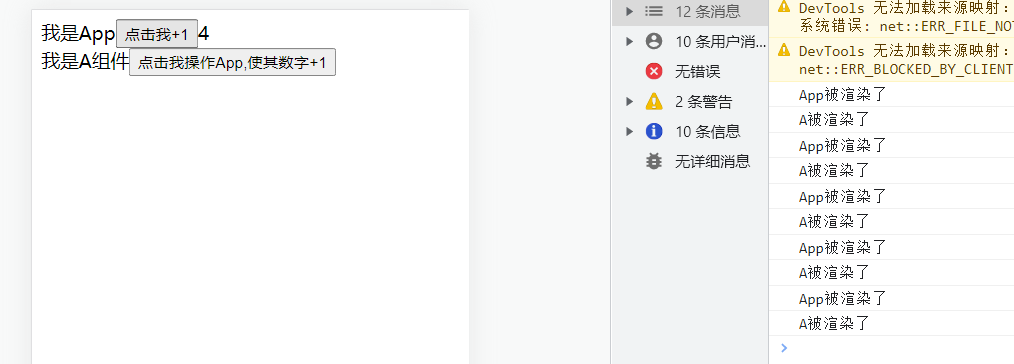
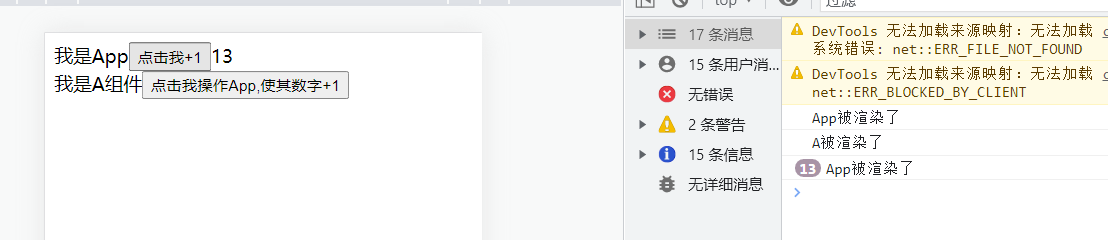
useCallback 使用React.memo后,的确可以做到缓存的功能,但是如果子组件接收了来自父组件通过props传递的函数,在使用React.memo后会发生什么?(复习下React.memo,发生props变化的时候才会重新渲染,否则就不会重新渲染) 1 2 3 4 5 6 7 8 9 10 11 12 13 14 15 16 17 18 19 20 21 22 23 24 25 26 27 28 29 30 31 32 33 34 35 36 37 App .jsx import React , {useState} from 'react' ;import A from "./component/A" ;const App = ( console .log ('App被渲染了' ) const [number,setNumer] = useState (0 ); const handleClick = ( setNumer (prevState =>1 ); } return ( <div > 我是App <button onClick ={handleClick} > 点击我+1</button > {number} <A add ={handleClick}/ > </div > ); }; export default App ;A.jsx import React from 'react' ;const A = (props ) => { console .log ('A被渲染了' ) return ( <div > 我是A组件 <button onClick ={props.add} > 点击我操作App,使其数字+1</button > </div > ); }; export default React .memo (A);
效果图,可以看到,即使使用了React.memo,A组件接收了父组件传递过来的值的时候,依旧会因为父组件的改变而导致组件重新渲染(因为props改变了嘛)
上述代码示例情况就是因为A组件的重新渲染导致handleClick被重新创建,导致重复渲染后相加的值并不是1了,所以我们可以使用useCalback来创建react中的回调函数去避免这种情况 useCallback是一个钩子函数,用来创建react中的回调函数useCallback创建的回调函数不会在组件重新渲染时重新创建useCallback参数1 2 3 4 5 6 7 8 参数: 参数1:回调函数 参数2:依赖数组 当依赖数组的变量发生变化时,回调函数才会重新执行 如果不指定依赖数组(也就是第二个参数什么都不写), 回调函数每次被渲染的时候就会被重新执行 一定要将回调函数中使用到的所有变量设置到依赖当中 除了setState,因为这个不会变~
总结
如果想每次渲染都执行,第二个参数什么都不写 如果想只当使用到的变量发生改变重新调用,那么第二个参数以数组的形式传入使用到的变量名(也就是写入依赖项目) 如果想只执行一次(初始化的时候执行),第二个参数传入空数组[] 示例
1 2 3 4 5 6 7 8 9 10 11 12 13 14 15 16 17 18 19 20 21 22 23 import React , {useCallback, useState} from 'react' ;import A from "./component/A" ;const App = ( console .log ('App被渲染了' ) const [number,setNumer] = useState (0 ); const handleClick = useCallback (() => { setNumer (prevState =>1 ); },[]) return ( <div > 我是App <button onClick ={handleClick} > 点击我+1</button > {number} <A add ={handleClick}/ > </div > ); }; export default App ;
可以看到,即使App发生了重写渲染,A组件也不会重新渲染,因为App当中的callBack我们设置为了只会在创建的时候执行一次
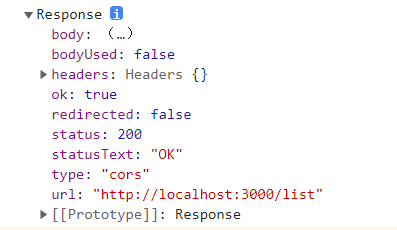
(todo)Strapi的使用 使用fetch 这里简单记录下,具体的可以看@mdn-fetch 需要注意的是也就除了网络故障时和请求被阻止 ,其他情况都是resolve 所以我们可以通过判断ok来进行相应的操作 1 当接收到一个代表错误的 HTTP 状态码时,从 fetch() 返回的 Promise 不会被标记为 reject,即使响应的 HTTP 状态码是 404 或 500。相反,它会将 Promise 状态标记为 resolve(如果响应的 HTTP 状态码不在 200 - 299 的范围内,则设置 resolve 返回值的 ok 属性为 false),仅当网络故障时或请求被阻止时,才会标记为 reject。
1 2 3 4 5 6 7 fetch ('http://localhost:3000/list' ).then (res => console .log (res) }) .catch (error => })
1 2 3 4 5 6 7 8 9 10 11 12 13 14 15 16 17 fetch ('http://localhost:3000/list1414' ) .then (res => const {ok} = res; if (ok){ return res.json (); } throw new Error ('网络异常' ) }) .then (res => console .log (res.data ); }) .catch (error => console .log (error.message ); })
示例student没有做任何逻辑修改,所以只列出app.jsx内容 1 2 3 4 5 6 7 8 9 10 11 12 13 14 15 16 17 18 19 20 21 22 23 24 25 26 27 28 29 30 31 32 33 34 35 36 37 38 39 40 41 42 import React , {useState,useEffect} from 'react' ;import StudentList from "./components/StudentList" ;import './App.css' ;const App = ( const [stuData, setStuData] = useState ([]); const [isLoading,setLoading] = useState (false ); const [isError,setError] = useState (false ); useEffect (() => { setLoading (true ); setError (false ) fetch ('http://localhost:3000/list' ) .then (res => const {ok} = res; setLoading (false ); if (ok){ return res.json (); } throw new Error ('网络异常' ) }) .then (res => setStuData (res); }) .catch (error => setError (true ) console .log (error.message ); }) },[]) return ( <div className ="app" > {/*不处于加载的时候就展示列表*/} { !isLoading && !isError && <StudentList stus ={stuData}/ > } {/*加载状态*/} { isLoading && '加载数据中...' } {/*是否出错*/} {isError && '数据出错...'} </div > ); }; export default App ;
当然,你也可以使用async 和 await注意;useEffect的第一个参数不能是异步的 我现在才知道原来try catch后面还有finally………… 1 2 3 4 5 6 7 8 9 10 11 12 13 14 15 16 17 18 19 20 21 22 23 24 25 26 27 28 29 30 31 32 33 34 35 36 37 38 39 40 41 42 43 import React , {useState,useEffect} from 'react' ;import StudentList from "./components/StudentList" ;import './App.css' ;const App = ( const [stuData, setStuData] = useState ([]); const [isLoading,setLoading] = useState (false ); const [isError,setError] = useState (false ); useEffect (() => { const fetchData = async ( try { setLoading (true ); setError (false ) const res = await fetch ('http://localhost:3000/list' ); if (res.ok ){ const data = await res.json (); setStuData (data) }else { throw new Error ('网络异常' ) } }catch (e){ setError (e) }finally { setLoading (false ); } } fetchData (); },[]) return ( <div className ="app" > {/*不处于加载的时候就展示列表*/} { !isLoading && !isError && <StudentList stus ={stuData}/ > } {/*/!*加载状态*!/*/} { isLoading && '加载数据中...' } {/*/!*是否出错*!/*/} {isError && '数据出错...'} </div > ); }; export default App ;
自定义钩子(selfHooks) 其实自定义钩子就是一个普通函数,只是他的名字需要使用use开头,(自定义钩子就是对其他钩子的封装 ) redux,RTK,RTKQ 1 2 3 4 5 6 7 8 9 10 11 12 13 14 15 16 17 18 reduex核心思想 多个state放置在一起去统一管理 Reducer 对于state的所有操作,都保存到同一个函数 Store 仓库对象,无论是订阅还是派发任务,都是通过store 根据reducer创建对应的store dispatch(Store里面的方法) dispatch依旧是告诉reducer怎么去处理state数据 怎么理解从Store里面调用dispatch呢?因为store根据reducer创建的,所以想要操作数据,自然也应该是从store触发 getState(),从store获取数据 因为redux是适合所有的js的,所以是发布者,订阅者模式 所以store.subscribe(回调函数),发生变化的时候就会执行回调函数
1 2 3 4 5 6 7 8 9 10 11 12 function reducer (prestate,action ){ preState 即将更新前state的值,reducer的返回值将作为state的新值 action 是一个普通的js对象,可以保存操作的信息 type表示操作类型 其他需要传递的参数,也可以在action设置 } 通常存储的是一个对象 const store = Redux .createStore (reducer,初始值); function reducer (preState = 1 ,action ) {.....}
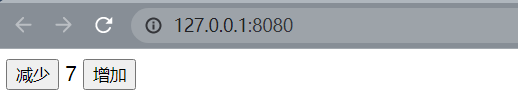
redux在html当中的使用
1 2 3 4 5 6 7 8 9 10 11 12 13 14 15 16 17 18 19 20 21 22 23 24 25 26 27 28 29 30 31 32 33 34 35 36 37 38 39 40 41 42 43 <html > <head > <meta charset ="UTF-8" > <meta name ="viewport" content ="width=device-width, user-scalable=no, initial-scale=1.0, maximum-scale=1.0, minimum-scale=1.0" > <meta http-equiv ="X-UA-Compatible" content ="ie=edge" > <title > Redux</title > <script src ="https://cdn.bootcdn.net/ajax/libs/redux/4.2.0/redux.min.js" > </script > </head > <body > <button onclick ="handleClickReduce()" > 减少</button > <span id ="number" > 1</span > <button onclick ="handeClickAdd()" > 增加</button > <script > const spanNumber = document .getElementById ('number' ) const reducer = (preState,action ) => { const {type} = action; switch (type){ case 'ADD' : return preState + 1 ; case 'SUB' : return preState - 1 ; default : return preState; } } const store = Redux .createStore (reducer,1 ); store.subscribe (() => { console .log ('发生改变了' ,store.getState ()) spanNumber.textContent = store.getState (); }) const handleClickReduce = ( store.dispatch ({type :'SUB' }) } const handeClickAdd = ( store.dispatch ({type :'ADD' }) } </script > </body > </html >
(todo)如果需要指定加任意数,通过dispatch传递即可(reducer第二个action其实就是一个普通的对象) 1 2 3 4 5 6 7 8 9 10 11 12 13 14 15 16 17 18 19 20 21 22 23 24 ```  ### redux的一些缺点 * 如果state过于复杂,将会非常难于维护 * 可以通过对state分组进行解决,通过创建多个reducer,然后将其合并为一个 * state每一次操作,都需要对state进行复制,然后再去修改,如果需要修改第三层的值,那岂不是很复杂 * case后边的**常量**维护起来比较麻烦 * 后面二个redux也想到了,所以可以使用`Redux Toolkit(RTK)`,RTK可以完全替换掉redux,RTK包含了redux ### RTK * 安装全套(别忘记安装`react-redux`) ```bash # NPM npm install @reduxjs/toolkit react-redux # Yarn yarn add @reduxjs/toolkit react-redux
1 2 3 4 5 6 7 8 9 10 11 12 13 14 15 16 17 18 19 20 21 22 import {createSlice} from "@reduxjs/toolkit" ;const stuSlice = createSlice ({ name :'stu' , initialState : { name :'动感超人' , }, reducers :{ setName (state,action ){ state.name = '西瓜超人' ; } } }); console .log (stuSlice.actions .setName ('进去的参数' ));
输出结果查看stuSlice
1 2 3 4 5 6 7 8 9 10 11 12 13 14 15 16 17 18 19 20 21 22 23 24 25 26 27 28 29 30 31 32 33 34 35 36 37 38 39 40 41 import {createSlice,configureStore} from "@reduxjs/toolkit" ;const stuSlice = createSlice ({ name :'stu' , initialState : { name :'动感超人' , age :18 , }, reducers :{ setName (state,action ){ state.name = '西瓜超人' ; }, setAge (state,action ){ } } }); export const {setName,setAge} = stuSlice.actions ;export default configureStore ({ reducer :{ student :stuSlice.reducer , } })
使用redux传递着使用Provider传递store 接受者通过useSelectore获取对应的state 通过useDispatch获取派发操作store的对象(也就是dispatch) 通过暴露的函数生成操作类型和操作值的对象(也就是setName的返回值) src/index.js
1 2 3 4 5 6 7 8 9 10 11 import ReactDOM from "react-dom/client" import App from "./App" import {Provider } from "react-redux" ;import store from "./store/index" ;const root = ReactDOM .createRoot (document .getElementById ('root' ))root.render ( <Provider store ={store} > <App /> </Provider > )
App.jsx
1 2 3 4 5 6 7 8 9 10 11 12 13 14 15 16 17 18 19 20 21 import React from 'react' ;import {useSelector,useDispatch} from "react-redux" ;import {setName} from "./store" ;const App = ( const store = useSelector (state =>student ); const dispatch = useDispatch (); const handleClick = ( dispatch (setName ('我是动感超人' +Date .now ())) } return ( <div > {store.name} <button onClick ={handleClick} > 更改我的名字</button > </div > ); }; export default App ;
存在的一些缺点和解决办法 如果创建多个切片,并且每一个切片reducers都有setName方法,那么会导致暴露出去的方法重名了 解决办法:不同的切片不同的文件(其实就是reducers分开) store/index.js
1 2 3 4 5 6 7 8 9 10 11 import {configureStore} from "@reduxjs/toolkit" ;import stuReducer from "./stuSlice" import addressReducer from "./addressSlice" export default configureStore ({ reducer :{ student : stuReducer, address : addressReducer, } })
store/stuSlice.js
1 2 3 4 5 6 7 8 9 10 11 12 13 14 15 16 17 18 19 20 21 import {createSlice} from "@reduxjs/toolkit" ;const stuSlice = createSlice ({ name :'stu' , initialState :{ name :'傻瓜超人' , age :18 , }, reducers :{ setName (state,action ){ state.name = action.payload ; }, setAge (state,action ){ state.age = action.payload ; } } }); export const {setName,setAge} = stuSlice.actions ;export default stuSlice.reducer ;
store/addressSlice.js
1 2 3 4 5 6 7 8 9 10 11 12 13 14 15 16 import {createSlice} from "@reduxjs/toolkit" const addressSlice = createSlice ({ name :'address' , initialState :{ address :'高老庄' }, reducers :{ setAddress (state,action ){ state.address = action.payload } } }) export const {setAddress} = addressSlice.actions ;export default addressSlice.reducer ;
使用
1 2 3 4 5 6 7 8 9 10 11 12 13 14 15 16 17 18 19 20 21 22 import React from 'react' ;import {useSelector,useDispatch} from "react-redux" ;import {setName,setAge} from "./store/stuSlice" ;import {setAddress} from "./store/addressSlice" ;const App = ( const { student,address } = useSelector (state => const dispatch = useDispatch (); return ( <div > <span > 姓名:{student.name}</span > <span > 年龄:{student.age}</span > <span > 地址:{address.address}</span > <button onClick ={() => dispatch(setName('张三'))}>设置姓名为"张三"</button > <button onClick ={() => dispatch(setAge(888))}>设置年龄为888</button > <button onClick ={() => dispatch(setAddress('地球村'))}>设置地址为"地球村"</button > </div > ); }; export default App ;
RTK不仅帮助我们解决了state的问题,同时,它还为我们提供了RTK Query用来帮助我们处理数据加载的问题。RTK Query是一个强大的数据获取和缓存工具。在它的帮助下,Web应用中的加载变得十分简单,它使我们不再需要自己编写获取数据和缓存数据的逻辑。
Web应用中加载数据时需要处理的问题:
根据不同的加载状态显示不同UI组件 减少对相同数据重复发送请求 使用乐观更新,提升用户体验 在用户与UI交互时,管理缓存的生命周期 在之前我们就是通过自己每一次发送请求,就创建对应的状态,比如isLoading,isError来处理加载时候的状态的,有了RTKQ,我们就不需要做这些事情了,我们通过RTKQ来帮我们完成这事情
更多说明和教学可以看看 @李立超的RTKQ
第一步:配置RTKQ store/studentApi.js
1 2 3 4 5 6 7 8 9 10 11 12 13 14 15 16 17 18 19 20 21 22 23 24 25 26 27 28 29 30 31 32 33 34 35 36 37 38 39 40 import {createApi, fetchBaseQuery} from "@reduxjs/toolkit/dist/query/react" ;const studentApi = createApi ({ reducerPath :'studentApi' , baseQuery :fetchBaseQuery ({ baseUrl :'http://localhost:3000/' }), endpoints :(build ) => { return { getStudents :build.query ({ query (arg ) { return 'students' ; }, transformResponse (baseQueryReturnValue ){ return 转换后的结果 } }) } } }) export const { useGetStudentsQuery } = studentApi;export default studentApi;
第二步:创建store对象 store/index.js
1 2 3 4 5 6 7 8 9 10 11 12 13 14 import {configureStore} from "@reduxjs/toolkit" ;import studentApi from "./studentApi" ;export default configureStore ({ reducer :{ [studentApi.reducerPath ]:studentApi.reducer , }, middleware :getDefaultMiddleware => return getDefaultMiddleware ().concat (studentApi.middleware ) } })
随后主入口文件src/index.js
1 2 3 4 5 6 7 8 9 10 11 12 import ReactDOM from "react-dom/client" import App from "./App" import store from "./store" import {Provider } from "react-redux" ;const root = ReactDOM .createRoot (document .getElementById ('root' ))root.render ( <Provider store ={store} > <App /> </Provider > )
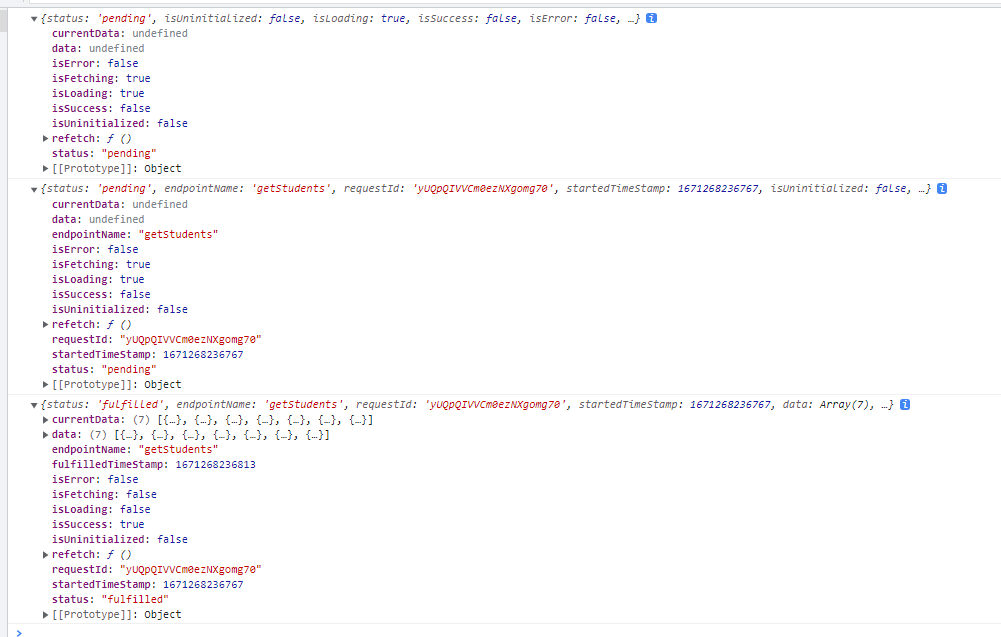
第三步:使用RTKQ 输出查看调用api中钩子查询的返回值可以看到,输出了三次,可以简单理解为发送前,发送中,发送完成 每一个阶段都会有具体的字段进行标识,比如isLoading,isFetching,isSuccess,isError等 这样子就可以便于我们去操作(至少我们不用自己写什么isLoading,isError了,RTKQ帮我们完成了) 1 2 3 4 5 6 7 8 9 10 11 12 13 14 15 16 17 import React from 'react' ;import {useGetStudentsQuery} from "./store/studentApi" ;const App = ( const obj = useGetStudentsQuery (); console .log (obj) return ( <div > 我是App </div > ); }; export default App ;
1 2 3 4 5 6 7 8 9 10 11 12 13 14 15 16 17 18 19 20 21 22 23 24 import React from 'react' ;import {useGetStudentsQuery} from "./store/studentApi" ;const App = ( const { isLoading,data,isSuccess} = useGetStudentsQuery (); return ( <div > { isLoading && '加载中...'} {isSuccess && data.map(item => <p key ={item.id} > 姓名:{item.name} <br /> 性别:{item.sex} <br /> 年龄:{item.age} <br /> 地址:{item.address} <br /> </p > ) } </div > ); }; export default App ;
效果
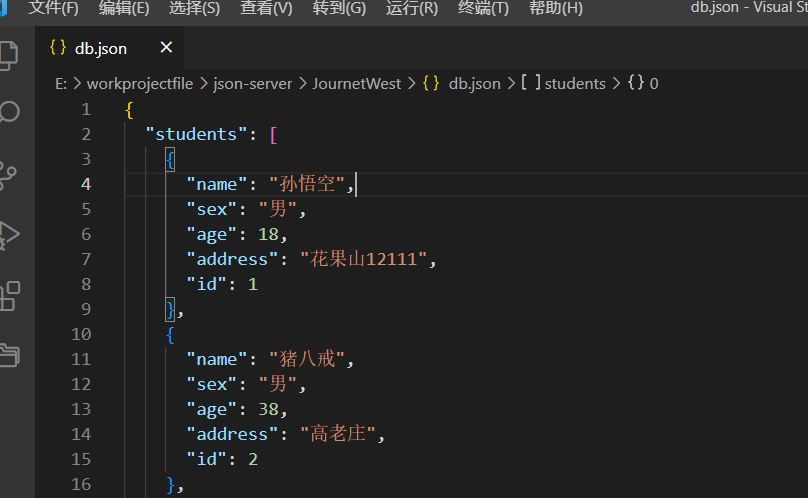
数据库的结构
编辑信息使用RTK保持最新数据 在之前编辑学生数据的时候,是通过props来传递数据的,但是如果有一个人修改了数据我们没有更新,就会导致我们编辑的时候使用的是旧数据,用户体验不好 所以我们可以在编辑的时候重新请求服务器,重新查询数据 使用RTKQ关键就是如果传参和如何定义接口 1 2 3 4 5 6 7 8 9 10 11 12 13 14 15 16 17 18 19 20 21 22 23 24 25 26 27 28 29 30 31 32 33 34 35 36 37 38 39 40 41 42 43 const studentApi = createApi ({ endpoints :(build ) => { return { getStudents :build.query ({ query ( return 'students' ; } }), getStudentInfo :build.query ({ query (id ) { return `students/${id} ` ; } }) } } }) export const { useGetStudentsQuery,useGetStudentInfoQuery} = studentApi;const {data,isSuccess} = useGetStudentInfoQuery (props.id );const [formData,setFormData] = useState ({ name : props.name ? props.name : "" , sex : props.sex ? props.sex : "男" , age : props.age ? props.age : "" , address : props.address ? props.address : "" , }); useEffect (() => { if (isSuccess){ setFormData ({ ...data, }) } },[isSuccess])
设置缓存时间和数据转换-query RTKQ是自带缓存的,默认为60秒, 当我们点击修改的时候,会向后台发送请求,此时数据已经是缓存了,我们再次点击修改,数据已经被缓存,所以不会发送请求了,但是如果有人修改了数据,受到缓存的限制,不会重新请求,所以需要我们可以设置缓存时间keepUnusedDataFor ,默认是60秒 每一个接口查询都可以设置缓存时间,默认为60(单位秒) 1 2 3 4 5 6 7 8 9 10 11 12 13 14 15 16 17 18 19 20 21 22 23 24 25 26 const studentApi = createApi ({ endpoints :(build ) => { return { getStudents :build.query ({ query ( return 'students' ; } }), getStudentInfo :build.query ({ query (id ) { return `students/${id} ` ; }, keepUnusedDataFor :5 , transformResponse (baseQueryReturnValue ){ return 转换后的结果 } }) } } })
useQuery的返回值查看 先看图,输出useQuery的返回值
refetch函数
status:string - 请求的状态
pedding:数据正在加载 fulfilled:数据加载完成 isFetching:boolean - 数据是否正在加载 ,不管第几次加载,就会设置其状态
isLoading:boolean - 表示数据是否第一次加载 ,通过调用refetch不会改变此状态
isSuccess:boolean - 请求是否成功
isUninitialized:boolean -请求是否还没有开始发送,常用在删除操作的请求上
error:对象 有错才存在对象,无错误就没有这个
data:最新返回的数据(在重新发送请求的时候,会保存上一次请求返回的数据)
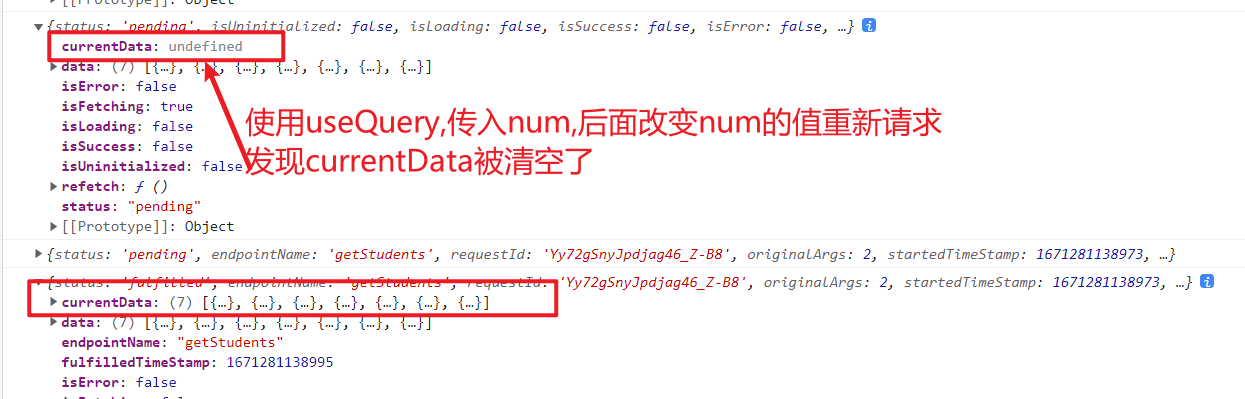
currentData:当前参数的最新数据,(当参数变化的时候,会清空(变为undefined))
比如在一个列表搜索想要的汉堡名称,搜索的时候我如果想清空原来的数据并展示等待图标,数据加载完成后才渲染返回的数据,就可以使用currentData,如果不想清空原来的数据,而是等到数据返回后替换原来的数据,就可以使用data
useQuery设置参数 useQuery第一个参数 可以成为每一个请求的query函数传入的参数1 2 3 4 5 6 7 8 9 10 11 12 13 14 15 16 17 import {useGetStudentInfoQuery} from "../store/studentApi" ;const {data,isSuccess} = useGetStudentInfoQuery (id);const studentApi = createApi ({ endpoints :(build ) => { getStudentInfo :build.query ({ query (id ){ return `students/${id} ` } j }) } })
useQuery第二个参数 可以传入对象通过该对象可以对请求进行配置
创建的时候传入的对api的配置可以说默认配置 使用的时候传入的第二个参数配置可以更加具有定制化特点,和默认配置发生冲突的时候以这个为准 selectFromResult函数,返回值作为useQuery返回值
比如我可以设置data的数据,对data数据进行过滤 1 2 3 4 5 6 7 8 const res = useGetStudentsQuery (null ,{ selectFromResult : (result ) => { if (result.data ){ result.data = result.data .filter (item =>age < 18 ) } return result; } });
pollingInterval默认为0,设置轮询的间隔(隔一段时间发送请求),单位毫秒,为0表示不轮询
skip设置是否跳过当前请求,默认false
比如一个组件既有编辑功能,也有添加功能,那么我们需要在添加功能的时候跳过请求,否则就添加的时候就会向后台请求初始化数据 1 2 3 4 const {data,isSuccess} = useGetStudentInfoQuery (props.id ,{ skip :!props.id , });
refetchOnMountOrArgChange:默认false 设置是否每次都重新加载数据(也就是设置是否不使用缓存)也可以设置为数字,为数字的话就是设置缓存有效期
refetchOnFocus:默认false, 是否在重新获取焦点时重载数据(比如切换页面)
如果设置为true,需要在store当中设置setupListeners(store.dispatch) 1 import {setupListeners} from "@reduxjs/toolkit/query"
refetchOnReConnect:默认false, 是否在重新连接后重载数据 (没网了,重新连接了网)
RTKQ构造器构造API请求 如果发送的不是get信息(当然,get也可以设置配置对象),我们就不可能像之前写query一样了 1 2 3 4 5 6 7 8 9 10 11 12 13 14 15 16 17 18 19 20 21 22 23 24 25 26 27 28 29 30 31 32 33 34 35 36 37 38 39 40 41 const studentAPi = createApi ({ endpoints :(build ) => { return { getStudent :build.query ({ query ( return 'students' } }) } } }) const studentApi = createApi ({ endpoints :(build ) => { return { delStudent :build.mutation ({ query (参数 ){ return { url :'students/${参数}' , method :'delete' , body :传递的数据 } } }) } } })
删除的调用和查询的调用不太一样,因为删除不是页面加载后就立马删除,而是用户确认删除后才执行删除操作,添加的操作也是如此,修改的也是 1 2 3 4 5 6 7 8 9 10 11 12 13 14 15 16 17 18 19 import {useDelStudentInfoMutation} from "../store/studentApi" ;const a = useDelStudentInfoMutation ();[f,{isError,isLoading,isSuccess,isUninitialized,originalArgs,reset,status}]; const [delStudent,{isSuccess}] = useDelStudentInfoMutation ();const handleClick = useCallback (async (id) => { delStudent (id); })
jsx的具体操作添加,修改
1 2 3 4 5 6 7 8 9 10 11 12 13 14 15 16 17 18 19 20 21 22 23 24 25 26 27 28 29 30 31 32 33 const [formData,setFormData] = useState ({ name : props.name ? props.name : "" , sex : props.sex ? props.sex : "男" , age : props.age ? props.age : "" , address : props.address ? props.address : "" , }); const [editStudentInfo,{isSuccess :editSuccess}] = useEditStudentInfoMutation ();const [addStudent] = useAddStudentInfoMutation ();const handleAdd = useCallback (async () => { addStudent ({ ...formData, }); setFormData ({ name : "" , sex : "男" , age : "" , address : "" , }) }); const handleEditConfirm = useCallback (async () => { editStudentInfo ({ id :props.id , info :formData, }); },)
studentApi.js的query定义
1 2 3 4 5 6 7 8 9 10 11 12 13 14 15 16 17 18 19 20 editStudentInfo :build.mutation ({ query (newInfo ) { return { url :`students/${newInfo.id} ` , method :'put' , body :newInfo.info , } } }), addStudentInfo :build.mutation ({ query (info ){ return { url :'students' , method :'post' , body :info, } } })
RTKQ的数据标签 首先我们需要创建标签 1 2 3 4 5 6 7 8 9 const studentApi = createApi ({ reducerPath :'xxxxx' , tagTypes :['student' ], endpoints :(buidl ) => { } })
给请求的数据添加标签
给API切片的钩子函数添加providesTags属性,属性值可以为数组字符串,数组对象,回调函数 1 2 3 4 5 6 7 8 9 10 11 12 13 const studentApi = createApi ({ tagTypes :['student' ], endpoints :(build ) => { return { xxxxx :build.query ({ query ( return xxxx }, providesTags :xxxxx }) } } })
当providesTags为数组字符串的时候等同于数组对象的简写 只要type和invalidates对应,就会重新请求数据 1 2 3 providesTags :['student' ];providesTags :[{type :'student' }]
当providesTags为数组对象的时候所有数据(type和id)都需要和invalidates对应才会重新请求数据 id如果是字符串数字,如果有对应的id,依旧会失效 1 2 providesTags :[{type :'student' ,id :100 }];providesTags :[{type :'student' ,id :'100' }];
1 2 3 4 5 6 7 8 当providesTags属性的值为回调函数时,可以对标签的生效范围做更细致的划分 参数1 :网络请求的返回结果 参数2 :错误信息 参数3 :钩子函数中传入的实参 providesTags :(result,error,params,meta ) => { return [{type :'student' ,id :params.id }] }
给请求的数据设置要失效的标签
1 2 3 4 5 6 7 8 9 10 11 12 13 14 15 16 const studentApi = createApi ({ tagTypes :['student' ], endpoints :(build ) => { return { delStudent :build.mutation ({ query (id ){ return { url :xxxx, method :'delete' , } invalidatesTags :xxxx } }) } } })
当invalidatesTags为数组字符串时候只要providesTags当中type包含在invalidatesTags,就会重新请求数据 数组字符串的写法等同于数组对象的简写 1 2 3 4 5 6 7 8 9 invalidatesTags :['student' ];providesTags :['student' ];providesTags :[{type :'student' }];providesTags :[{type :'student' ,id :100 }];invalidatesTags :['student' ];等同于,二个效果是一样的 invalidatesTags :[{type :'student' }];
当invalidatesTags为数组对象的时候指明id则让type和id二者都对应的标签失效 未指明就和数组字符串失效规则一样 1 2 3 4 5 6 7 8 9 10 invalidates :[{type :'student' ,id :10 }];providesTags :['student' ];providesTags :[{type :'student' }];providesTags :[{type :'student' ,id :10 }];providesTags :[{type :'student' ,id :'10' }];providesTags :[{type :'student' ,id :888 }];
1 2 3 4 5 6 7 invalidatesTags :(result,error,stu,meta ) => { return [ {type :'student' ,id :stu.id }, {type :'student' ,id :'LIST' } ] }
示例,老师的例子当添加数据后,会刷新列表 当编辑后,会刷新列表,但是如果数据没有变动的话,点击编辑就不会重新查询(存在缓存的前提下) 1 2 3 4 5 6 7 8 9 10 11 12 13 14 15 16 17 18 19 20 21 22 23 24 25 26 27 28 29 30 31 32 33 34 35 36 37 38 39 40 41 42 43 44 45 46 47 48 49 50 51 52 53 54 55 56 57 58 59 60 61 62 63 64 65 66 67 68 69 70 71 72 73 74 75 76 77 78 79 80 81 82 83 84 85 86 87 88 89 90 91 import {createApi, fetchBaseQuery} from "@reduxjs/toolkit/dist/query/react" ;const studentApi = createApi ({ reducerPath :'studentApi' , baseQuery :fetchBaseQuery ({ baseUrl :'http://localhost:3000/' }), tagTypes :['student' ], endpoints :(build ) => { return { getStudents :build.query ({ query ( return 'students' ; }, providesTags :[{type :'student' ,id :'initList' }] }), getStudentInfo :build.query ({ query (id ) { return `students/${id} ` ; }, providesTags :(result, error, arg, meta ) => { return [ {type :'student' ,id :arg}, ] }, }), delStudentInfo :build.mutation ({ query (id ){ return { url :`students/${id} ` , method :'delete' , } }, invalidatesTags :[{type :'student' ,id :'initList' }] }), editStudentInfo :build.mutation ({ query (newInfo ) { return { url :`students/${newInfo.id} ` , method :'put' , body :newInfo.info , } }, invalidatesTags :(result, error, arg, meta ) => { return [ {type :'student' ,id :'initList' }, {type :'student' ,id :arg.id }, ] } }), addStudentInfo :build.mutation ({ query (info ){ return { url :'students' , method :'post' , body :info, } }, invalidatesTags :[{type :'student' ,id :'initList' }] }) } } }) export const { useGetStudentsQuery, useGetStudentInfoQuery, useDelStudentInfoMutation, useAddStudentInfoMutation, useEditStudentInfoMutation, } = studentApi; export default studentApi;
RTKQ使用axios 安装 更改 1 2 3 4 5 6 7 8 9 10 11 12 13 14 import {createApi} from "@reduxjs/toolkit/dist/query/react" ;import axios from "axios" ;const studentApi = createApi ({ reducerPath :'studentApi' , baseQuery :axios.create ({ baseURL :'http://localhost:3000/' }), })
请求体变更
比如post或者put等传参需要使用data,而不是body了 1 2 3 4 5 6 7 8 9 10 11 12 13 14 15 16 17 18 19 editStudentInfo :build.mutation ({ query (newInfo ) { return { url :`students/${newInfo.id} ` , method :'put' , data :newInfo.info , } }, invalidatesTags :(result, error, arg, meta ) => { return [ {type :'student' ,id :'initList' }, {type :'student' ,id :arg.id }, ] } }),
react-router-dom@5 1 yarn add react-router-dom@5
使用技巧 ,可以为路由模式起别名,当我们更改的时候,就不需要去组件更改了 index.js主入口
1 2 3 4 5 6 7 8 9 10 import ReactDOM from "react-dom/client" import App from "./App" import {BrowserRouter as Router } from "react-router-dom" ;const root = ReactDOM .createRoot (document .getElementById ('root' ))root.render ( <Router > <App /> </Router > )
App.jsx
1 2 3 4 5 6 7 8 9 10 11 12 13 const App = ( return ( <div > <Link to ="/" > 主页</span > <Link to ="/about" > 关于</span > <Route path ={ '/'} component ={Home} > </Route > <Route path ={ '/about '} component ={About} > </Route > </div > ); }; export default App ;
注意默认情况下Route并不是严格匹配,只要url地址的头部和path一致,组件就会挂载,不会检查子路径(也就是说url地址中包含了path,就会挂载组件 ) 所以上述代码会有问题,当我们进入/about的时候,即会加载Home组件和About,因为使用的是模糊匹配,所以我们可以使用精准匹配 1 2 <Route exact path={'/' } component={Home }></Route > <Route exact path ={ '/about '} component ={About} > </Route >
NavLink Route的传递方式 1 2 import Home from "./Home" ;<Route path ="/student/:id" component ={Home}/ >
方法2-通过renderrender需要传入一个回调函数,回调函数有一个routeProps参数,返回值为要渲染的组件 1 2 3 4 5 6 7 import Home from "./Home" ;<Route path ="/student/:id" render = { () => <Home /> } /><Route path ="/student/:id" render ={(routeProps) => <Home {...routeProps }/> } />
方法3-通过children来指定被挂载的组件
用法1:children设置一个回调函数时候 和render类似,写法一样可以说,当,该组件无论路径是否匹配都会挂载 1 2 3 4 5 <Route path="/student/:id" children={(routeProps ) => <Home {...routeProps }/> 访问/ 加载home 访问/abc 加载home
用法2:传入一个jsx,路径匹配才加载
当是无法传入match,location,history;但是可以用钩子函数解决 1 2 3 4 5 const match = useRouteMatch() const location = useLocation(); const history = useHistory(); const params = useParmas();//获取params参数
1 <Route path="/student/:id" children={ <Home}/> }/>
方法4-通过prop.children来
1 2 3 4 5 6 7 8 9 10 <Route path="/student/:id" > <Home /> </Route > <Route path ="/student/:id" > { routeProps => <Home {...routeProps }/> } </Route >
1 2 3 4 5 6 7 8 9 10 11 12 13 14 15 16 17 18 19 20 21 22 23 match :{ isExact 检查路径是否完全匹配 params : {} (默认空对象)请求的参数 path :设置的path属性 比如/student /student/:id url : 真实的路径比如/student /student/4 } 匹配的信息 location : { has : key :请求的id search :(默认undefined )查询的字符串比如/student?name=admin state :(默认undefined ) }地址信息 history : { go自由跳转(方法) goBack向后条(方法) goForwar向前跳(方法) push :历史记录添加一条新页面并跳转(方法) replace :替换记录并跳转(方法),跳转可以传递state replace ({pathname :'/student/2,state:{name:李白},) }控制页面的跳转
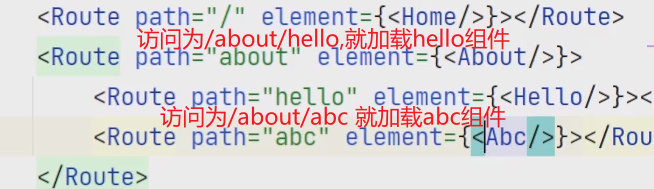
路由的嵌套 1 2 3 4 5 6 <Route path="/about" > <About /> <Route path ="/about/hello" > <Hello /> </Route > </Route >
Prompt组件 跳转确认 比如表单输入了,然后用户想跳转到另外一个页面,此时我们就可以使用Prompt组件,询问用户是否跳转 message属性设置提示信息when属性当为true的时候才会进行循环,默认值是true下面示例,当input有值的时候,就会进行询问用户是否进行跳转 1 2 3 4 5 6 7 8 9 10 11 12 13 14 15 16 17 18 import React , {useState} from 'react' ;import {Prompt } from "react-router-dom" const MyForm = ( const [value,setValue] = useState ('' ); const [isPrompt,setPrompt] = useState (false ); const handleOnChange = (e ) => { setValue (e.target .value ); setPrompt (!!e.target .value .trim ().length ); } return ( <div > <Prompt message ={ '确定离开当前页面吗 '} when ={isPrompt}/ > <p > form组件</p > <input type ='text' value ={value} onChange ={handleOnChange}/ > </div > ); }; export default MyForm ;
Redirect 重定向功能
属性
tofromreplace(默认替换方式为replace)push1 2 <Redirect from = "/abc" to="/form" />
如果有Switch,可以实现重定向功能
1 2 3 4 5 6 <Switch > <Route path ="/about" component ={About}/ > <Route path ="/home" component ={Home}/ > <Redirect to ="/home" /> </Switch >
react-router-dom@6 在react路由@6版本当中,我们必须要在所有的Route外面包一层Routes,作用和Switch类型,Routes中的Route只有一个会被匹配
Route不再使用component属性,而是element属性
NavLink
useParams,useLocation没有变化
useMatch检查当前url是否匹配某个路由 (注意,是路由,不是路径,比如路由是/student/:id,而不是/student/1)
useHistory删除,使用useNavigate代替,获取用于跳转页面的函数
const nav = useNavigate();nav('/home')跳转到/home默认push方法 nav('/about',{replace:true}),使用replace跳转Navigate标签添加
获取params useParams可以获取params参数比如在路由设置了/home/:id,当我们访问/home/100那么就可以通过useParams获取id信息 1 2 3 4 5 6 7 8 9 10 11 12 13 14 15 16 17 18 19 20 21 22 23 24 import React from 'react' ;import {useParams} from "react-router-dom" ;const STATIC_DATA = [ {id :1 ,name :'傻瓜超人' }, {id :2 ,name :'西瓜超人' }, {id :3 ,name :'动感超人' }, {id :4 ,name :'酸梅超人' }, ] const About = ( const {id} = useParams (); const findData = STATIC_DATA .find (item =>id === id*1 ) console .log (findData) return ( <div > <h2 > 超人的类型</h2 > <h3 > {findData.id} --- {findData.name}</h3 > </div > ); }; export default About ;
useNavigate(钩子) 1 2 3 4 5 6 7 8 9 10 11 12 13 14 15 16 17 18 19 20 import React from 'react' ;import {useNavigate} from "react-router-dom" const Home = ( const router = useNavigate () const handleClick = ( router ('/about/1' ,{ replace :true , }) } return ( <div > 我是精彩的主页 <button onClick ={handleClick} > 跳转到about页面</button > </div > ); }; export default Home ;
路由的嵌套和Outlt占位 1 2 3 4 5 6 <Routes > <Route path ={ '/home '} element ={ <Home /> }> <Route path ={ 'page '} element ={ <HomePage /> }/> </Route > <Route path ={ '/about /:id '} element ={ <About /> }> </Route > </Routes >
Home.jsx使用Outlet占位
1 2 3 4 5 6 7 8 9 10 11 12 13 14 15 16 17 18 19 20 21 import React from 'react' ;import {useNavigate,Outlet } from "react-router-dom" const Home = ( const router = useNavigate () const handleClick = ( router ('/about/1' ,{ replace :true , }) } return ( <div > 我是精彩的主页 <button onClick ={handleClick} > 跳转到about页面</button > <Outlet /> </div > ); }; export default Home ;
Outlet表示嵌套路由的组件,当嵌套路由中的路由匹配成功了,Outlet则表示嵌套路由的组件,没有匹配成功的话,Outlet就什么都不是Navigate组件 NavLink 1 2 3 4 5 6 7 8 9 10 11 12 13 14 15 16 17 18 19 20 21 22 23 24 25 26 27 28 29 30 31 32 33 34 35 .active_style { background-color : red; } import React from 'react' ;import {Link ,NavLink } from "react-router-dom" ;import "./test.css" ;const Menu = ( const activeStyle = ({isActive} ) => { return isActive ? 'active_style' : null ; } return ( <div > <Link to ={ '/home '}> Home页面</Link > {/*<NavLink to ='/home/page' className ={activeStyle} > Home页面下的page</NavLink > */} {/*或者*/} <NavLink to ={ '/home /page '} className ={ ({isActive }) => { return isActive ? 'active_style' : null; } }>Home页面下的page</NavLink > <Link to ={ '/about '}> 关于页面</Link > </div > ); }; export default Menu ;<a href ="/home/page" aria-current ="page" class ="active_style" > Home页面下的page</a > <a href ="/home/page" > Home页面下的page</a >
1 2 3 4 5 6 7 8 9 10 11 12 13 14 15 16 17 18 19 20 21 22 23 24 25 26 27 import React from 'react' ;import {Link ,NavLink } from "react-router-dom" ;const Menu = ( const activeStyle = ({isActive} ) => { return isActive ? {backgroundColor :'red' } : null ; } return ( <div > <Link to ={ '/home '}> Home页面</Link > {/*<NavLink to ='/home/page' style ={*/} {/* ({isActive }) => {*/} {/* return isActive ? {backgroundColor:'red'} : null*/} {/* }*/} {/*}>Home页面下的page</NavLink > */} <NavLink to ='/home/page' style ={activeStyle} > Home页面下的page</NavLink > <Link to ={ '/about '}> 关于页面</Link > </div > ); }; export default Menu ;<a aria-current ="page" class ="active" href ="/home/page" style ="background-color: red;" > Home页面下的page</a > <a class ="" href ="/home/page" style ="" > Home页面下的page</a >
其他钩子 useMemo 可以缓存一切,类似于useEffect,useCallback useCallback用来缓存函数对象,useMemo用来缓存函数的执行结果 React.forwardRef和useImperativeHandle React.forwardRef可以暴露ref对象给外部(比如可以在A组件通过ref来操作B组件当中的input输入框(完整的一个DOM))
而useImplerativeHandle可以指定暴露的ref对象给外部(比如A组件可以通过ref来操作B组件当中的input输入框的值 (只可以操作这个输入框的值))
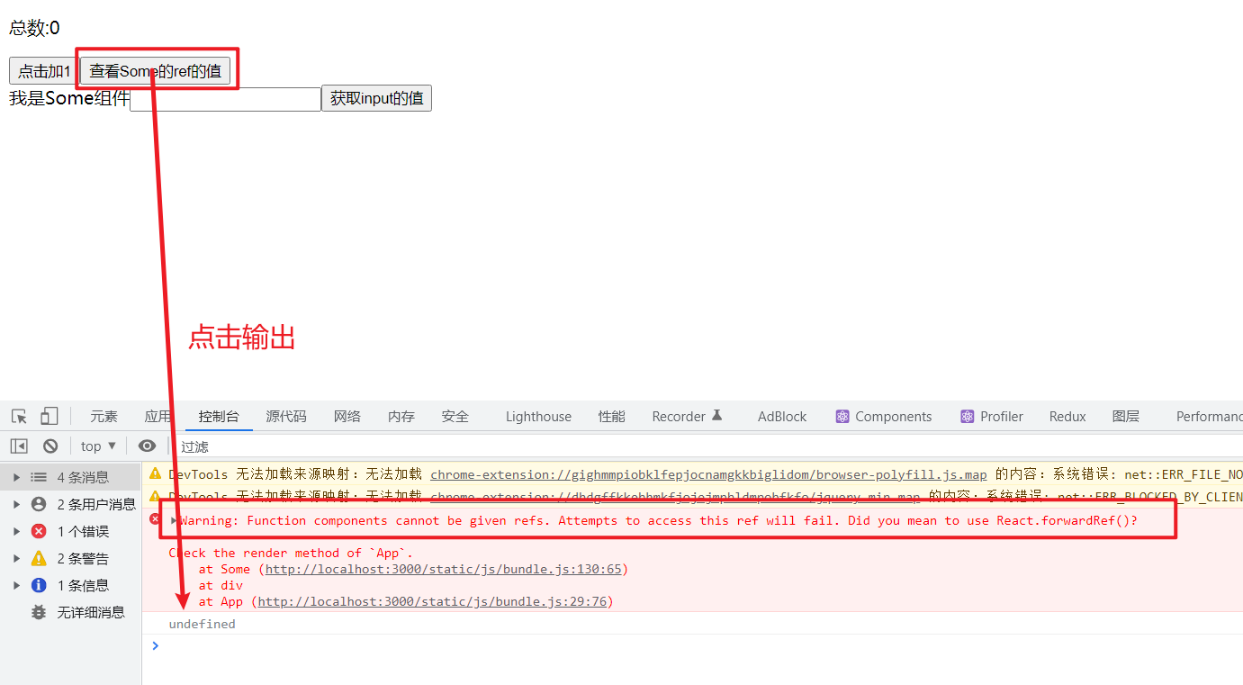
我们先来看看,如果直接给一个自定义组件绑定ref会发生什么
结果很明显,React提示Warning: Function components cannot be given refs. Attempts to access this ref will fail. Did you mean to use React.forwardRef()?,同时,输出ref也无法获取到值多个dom对象,react也不知道要给你谁 因为无法直接去获取react组件的dom对象,因为一个react组件可以含有 App.jsx组件
1 2 3 4 5 6 7 8 9 10 11 12 13 14 15 16 17 18 19 import React ,{useState,useRef} from 'react' ;import Some from "./component/Some" ;const App = ( const [count,setCount] = useState (0 ); const someRef = useRef (); const handleShow = ( console .log (someRef.current ) } return ( <div > <p > 总数:{count}</p > <button onClick ={() => setCount(prevState => prevState + 1)}>点击加1</button > <button onClick ={handleShow} > 查看Some的ref的值</button > <Some ref ={someRef}/ > </div > ); }; export default App ;
Some.jsx组件
1 2 3 4 5 6 7 8 9 10 11 12 13 14 15 16 17 18 import React ,{useRef} from 'react' ;const Some = ( const inputRef = useRef (); const handleBtn = ( console .log (inputRef.current .value ); } return ( <div > 我是Some组件 <input ref ={inputRef}/ > <button onClick ={handleBtn} > 获取input的值</button > </div > ); }; export default Some ;
所以我们需要使用React.forwardRef在自定义组件Some当中 Some.jsx组件
1 2 3 4 5 6 7 8 9 10 11 12 13 14 15 16 17 18 import React ,{useRef,forwardRef} from 'react' ;const Some = forwardRef ((props,ref ) => { const inputRef = useRef (); const handleBtn = ( console .log (inputRef.current .value ); } return ( <div > <p ref ={ref} > 我是Some组件</p > <input ref ={inputRef}/ > <button onClick ={handleBtn} > 获取input的值</button > </div > ); }) export default Some ;
App.jsx组件
1 2 3 4 5 6 7 8 9 10 11 12 13 14 15 16 17 18 19 20 import React ,{useState,useRef} from 'react' ;import Some from "./component/Some" ;const App = ( const [count,setCount] = useState (0 ); const someRef = useRef (); const handleShow = ( console .log (someRef) } return ( <div > <p > 总数:{count}</p > <button onClick ={() => setCount(prevState => prevState + 1)}>点击加1</button > <button onClick ={handleShow} > 查看Some的ref的值</button > <Some ref ={someRef}/ > </div > ); }; export default App ;
但是这样子使用forwardRef很不安全,因为你在外部组件直接可以操控这个Some组件的input,完完全全拿到了input,相当于你为了量一块钻石的尺寸,把这个钻石送给了比如,所以我们可以使用useImperativeHandle,只把”钻石”的一些属性告诉他 App.jsx
1 2 3 4 5 6 7 8 9 10 11 12 13 14 15 16 17 18 19 20 21 22 import React ,{useState,useRef} from 'react' ;import Some from "./component/Some" ;const App = ( const [count,setCount] = useState (0 ); const someRef = useRef (); const handleShow = ( const temp = count + 1 ; setCount (temp); someRef.current .setContext (temp) } return ( <div > <p > 总数:{count}</p > <button onClick ={handleShow} > 点击加1并设置Some组件P的值</button > <Some ref ={someRef}/ > </div > ); }; export default App ;
Some.jsx
1 2 3 4 5 6 7 8 9 10 11 12 13 14 15 16 17 18 19 20 21 22 23 24 25 26 27 import React ,{useRef,forwardRef,useImperativeHandle} from 'react' ;const Some = forwardRef ((props,ref ) => { const inputRef = useRef (); const pRef = useRef () const handleBtn = ( console .log (inputRef.current .value ); } useImperativeHandle (ref,() => { return { setContext (content ){ pRef.current .textContent = content; } } }) return ( <div > <p ref ={pRef} > 我是Some组件</p > <input ref ={inputRef}/ > <button onClick ={handleBtn} > 获取input的值</button > </div > ); }) export default Some ;
效果图
useEffect和useInsertionEffect和useLayoutEffect 执行顺序从先到后useInsertionEffect > useLayoutEffect > useEffect 当使用useEffect会出现闪的情况的时候,再考虑用其他二个
useDeferredValue 当我们多个组件使用同一个state时,组件有可能会互相影响,一个组件卡顿,会导致所有组件都卡 碎笔记 组件首字母必须要大写
react想要取消默认行为,可以通过事件对象来,比如event.preventDefault()取消默认行为,event.stopPropagation()取消事件冒泡
props是只读的,不能修改props属性
toLocaleString()
rsc-函数组件不带props
rsi函数组件带props
rcc-类组件
props.children表示函数的标签体
React中的钩子函数只能在函数组件或在自定义钩子中调用(是直接在函数组件使用
1 2 3 4 5 function App ( function fn ( usexxxxx, } }
在类中直接定义的箭头函数,this永远都指向实例对象 1 2 3 4 5 6 7 8 9 10 11 class MyClass { fn = () => { } fn2 ( const fn3 = ( } } }
为什么路由的时候不能使用超链接来实现路由的跳转?会导致向服务器发送请求重新加载页面,并且如果服务器没有做跳转操作下,在BrowserRouter模式下会发生404的情况通过链接跳转的方式(因为这个请求没有经过react-router进行处理),所以为了避免这种情况有二种解决办法使用HashRouter 服务器不会处理#后面的东东,我们请求localhost/#/about,服务器只会处理localhost,不会处理/about 如果依旧需要使用BrowserRouter, 就需要修改服务器的配置,将所有请求都转发到index.html 1 2 3 //错误写法 <a href="/">跳转到主页</a> <a href="/about">跳转到关于页</a>
fetchBaseQuery设置请求头并读取state的值1 2 3 4 5 6 7 8 9 10 11 12 13 14 15 16 17 18 19 20 21 22 23 24 25 26 27 28 29 30 const studentApi = createApi ({ baseQuery : fetchBaseQuery ({ baseUrl : "http://localhost:1337/api" , prepareHeaders : (headers,abc ) => { console .log (abc); endpoint : "getStudents" extra : undefined forced : false getState : ƒ a () type : "query" return headers; } }) }); const studentApi = createApi ({ baseQuery : fetchBaseQuery ({ baseUrl : "http://localhost:1337/api" , prepareHeaders : (headers, {getState} ) => { const token = getState ().auth .token ; return headers; } }), });
钩子只能在React组件和自定义钩子中使用钩子不能再嵌套函数或其他语句(if,switch,for)等中使用